Composting using a wormery is an ideal way to turn kitchen waste into a rich compost for your garden soil. You can convert an old style waste bin into a wormery by following the instructions given below. A wormery is a closed system which eliminates any potential problems with vermin.
What are the benefits of composting using a wormery?
- its a great way to recycle organic waste into excellent compost for enriching your soil, using in containers and grow bags.
- it reduces the amount of rubbish you send to the landfill each week (by as much as 50%) thus saving you money and reducing pressure on the environment
- it reduces the amount of peat you use leaving it in the bog where wildlife depends on it and saving you money on compost
- it gives you the satisfaction of doing some practical recycling at home and getting in touch with nature.
Can I make my own worm system?
Yes, you can make your own system by buying a suitable plastic container. This should have a well fitting lid, holes drilled along the base to allow excess water and organic leachate to come out of the bin, be big enough for your needs (60-90 litres), strong enough to take occasional knocks and the weight of the compost, and allow for relatively easy emptying once the bin is full. An ordinary black plastic rubbish is ideal.
 Making the worm bin
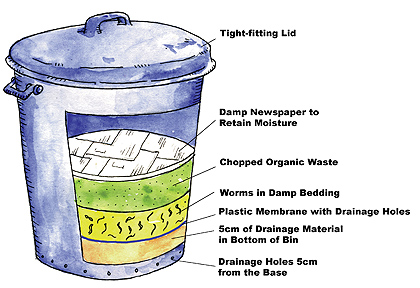
- Drill holes near the bottom of the bin to allow any excess water to escape.
- Put some gravel in the bottom to allow for drainage.
- Place a sheet of perforated heavy-duty plastic on top of the gravel.
- Put a layer of ‘bedding’ on top of the plastic for the worms. This can be one of or a mixture of the following materials: moist leaf mould, moist shredded paper, strawy manure, rotted compost.
- Finally add the brandling/tiger worms on top of the bedding. These can be obtained from any of the suppliers listed below (expect to pay around €50), fishing tackle shops, heaps of rotting farm manure or working compost heaps. If you know of someone who has a worm bin, maybe they have enough to spare to get you started. You will need at least 250 gms to begin.
- Finally, cover the worms with a sheet of wet newspaper. This acts to retain moisture and heat.
A bin of this construction would be enough for the waste of a 2-person household and is an ideal way to get a feel for how to vermicompost at the start. Once you have got the hang of the process you can add additional bins or scale up to larger containers.
What about pests and vermin when I vermicompost?
Provided you do not compost large quantities or rotting meat material, and you use a sealed container there should be no vermin problems. Put a lid on the bin to keep the flies out.
Do I need to look out for anything in particular when I start my bin?
In the beginning, cover the waste with wet newspaper to keep in moisture and prevent the organic material from drying out. Water the surface of the mixture if it gets dry. As the bin fills with organic compost there is less chance of it drying out, so the newspaper can be removed. When first feeding the worms put the food in one corner of the bin, so they have somewhere to move if they do not like the food. Be careful not to overfeed the worms. As their population increases you will be able to increase the amount and frequency with which you feed them. In general, you should see newly added soft green material eaten within a 2 week period. Tougher plant materials may take a bit longer for the worms to digest.
Should the worm bin be located in any special location?
Worms like to be kept warm so keep the bin away from the cold winds and frosts, ideally situating the bin in a sheltered spot that is sunny for only the early part of the day. Avoid very sunny locations as to much sun could overheat the bin which will cook the worms. If you want your worms to keep on making compost during the winter, it may be necessary to locate them in a shed or garage where temperatures do not fall below freezing. As the weather get colder keep an eye on the bins to make sure the worms are still active and breaking down the organic matter. You may have to slow down the rate at which you add food or you might want to throw an old blanket or towel over the bin to keep it warm. A build up of too much food may result in it putrefying and the bin will begin to smell.
How much material can I feed my worms each week?
It’s claimed that worms will process half their own body weight in organic matter each day. So 1kg of worms will process 1/2kg of organic waste per day. However, the rate of organic matter breakdown is also very much related to the conditions the worm bin is exposed to. In cooler winter weather the processing rate can be slower, while in the summer the worms turn over organic material very quickly. The amount of airflow in the bin is another factor that is important – worms are living organisms and need air, so opening the bin regularly is important (this will happen anyway as you add fresh organic material for them to break down). It is best to get a ‘feel’ for your own worm bin. Watch the food you put in, and when it has nearly gone, you can put more in. Over time, the feeding rate will become faster as your worm population increases. Feed your worms little and often.
What can I compost?
Virtually any organic waste can be put in the worm bin – but, for various reasons, some materials are best dealt with in other ways. The main ingredients will tend to come from your own house. It is important to have a mix of materials and will you learn with experience. A separate bin in the kitchen to collect compostable scraps would be helpful. Anything not of living origin will not compost (i.e. metal/glass/plastics). Avoid orange peel (citrus fruits), perennial weed roots and weed seeds, and grass mowings. Small quantities of meat scraps may be added to the bin, but avoid large quanties of meat that have gone off and may have become colonised by maggot larvae. If these are added to a bin, the maggots will continue to grow and develop into flies.
What materials can I put in a worm bin?
| PLEASE ADD | DO NOT ADD |
| Kitchen and household scraps – Old fruit and vegetables, cut flowers, tea leaves, coffee grounds, crushed eggshells, etc |
Dog and Cat droppings – This type of animal manure may carry parasites |
| Paper & Cardboard – Small amounts, torn up (avoid magazines and colour inks). Mix well with other items |
Man-made fibres – These will not rot |
| Grass cuttings Caution – High in nitrogen and a good “activator”, but care must be taken not to overwhelm the compost bin with grass as it can turn into a slimy mess. Mix well with other materials. Do not add more than 2 handfuls of grass clippings to a 70-90 litres worm bin at any one time |
Materials sprayed with weed killers – The residues may remain in the heap |
| Leaves – Add a little at a time. If there are l arge amounts these are best made into leaf mould in a separate heap |
Meat bones |
| Hair – From the family pet, or the family, moistened | Material infected with diseases – Composting may not kill these diseases |
| Wood Ash – Provides potassium and lime |
Are there any other potential problems?
Avoid too much acidic material such as lemon and orange skins can be hard for the worms to digest. Adding egg shells to the mix on an on-going basis will help keep the pH balance. Be careful how much food you add: too much may heat up the bin and drive the worms away, leaving the food to putrefy and the bin will begin to smell which a well run bin does not.
Where do I get the worms?
The worms needed for composting are known as tiger or brandling worms. They can be obtained from fishing tackle shops, from someone else that has a worm bin or from an old compost heap. They are smaller than true earthworms and they tend to have yellow bands between the segments at the “tail end” of the worm. For useful addresses, see list below.
Can I use garden earth worms in the bin?
No, earthworms are a different species and they are not adapted to living in fresh organic material like the tiger / brandling worms. In a worm bin they will die after a short while.
What are the little white worms I sometimes see in the worm bin?
The tiny white worms you see on the food on the surface of your bin are called Enchytraeids. They are also called ‘Potworms’ or ‘White Worms’. They won’t harm your bin or the compost worms. They are actually composters too. If you get a lot of them its an indication that the bin is slightly acidic. Consider adding a sprinkling of lime and you’ll notice them gone in a few days.
How many worms do I need?
If you don’t add too much material at the start and let the population of worms in the bin increase naturally you could start with as few as 100 worms. The trick at the start, however, is not to overfeed the worms. Ideally for a 70-90 litre bin it is recommended to use 250 gms of worms.
What about the liquid that starts to come out of the holes at the end of the bin?
The brown watery liquid coming out the holes at the end of the bin results from the break-down of the vegetable matter in the bin which can be as much as 95% water. The liquid is rich in minerals and nutrients ideal for plant growth so don’t throw it away. Place your bin on 3 red bricks or wooden blocks over a tray to collect the liquid. Scoop it out and store until you want to use it. Dilute it one part to 3 parts water and use it to feed plants in the garden or containers.
Once the bin is full what do I do?
This means it is time to harvest your compost. Get a couple of empty buckets and transfer the top six inches of fresh kitchen waste to the buckets along with all the worms. The deeper you go into the bin, the more brown and decomposed the compost becomes. Once you can’t identify individual waste any more, you are into compost. The compost will improve if left for a few weeks or months in a plastic bag. As you transfer the compost to the bags collect as many of the worms as you can and return them to the fresh material from the surface of the bin. They’ll provide you with a population to start a new bin.
What can I use the compost for?
Vermicompost is a gardener’s dream and very fertile material. It can be used for just about anything in the garden or container gardening but it should not be used for seedling germination as it is too rich. In general, it is better to mix it with leaf mould, cóir or shredded wood compost to make material suitable for potting on container grown plants or as a rich mix for tomatoes, cucumbers, beans and window boxes. If you have a lot of material, it can be used to enrich soil in the garden or vegetable plots.
What about worms in the compost once I use it?
They are not a problem and in fact if you store your compost for a while in a plastic sack you’ll find that the number of worms decreases quite dramatically (presumably the result of fresh food material being absent).
Text, Photographs and Images © Irish Peatland Conservation Council, Bog of Allen Nature Centre, Lullymore, Rathangan, Co. Kildare. Email: bogs@ipcc.ie; Tel: +353-45-860133.